Not all data is meant to be seen by all people. For example, you might need security rules that restrict data shown by region or management level. Restricting data by user is referred to as row-level security.
Similar to parental controls on your TV, Tableau provides ways to restrict, or filter, what data appears in visualizations based on the audience. However, the mechanisms for restricting access are not obvious and Tableau’s default is to make all the data in a report visible to everyone looking at it.
Methods for securing data in Tableau
Securing data by user in Tableau can be accomplished multiple ways depending on whether you have Tableau Server, Tableau Online (the hosted version of Tableau Server) or just Tableau Desktop.
The four methods for securing and filtering data by user are:
- Use Tableau Server Groups and a workbook filter (requires Tableau Server or Tableau Online)
- Tableau’s built-in user filters (requires Tableau Server or Tableau Online)
- Join to a security table
- Use database security to restrict access (requires a database that supports this)
In this blog, we provide step-by-step instructions for the first two methods.
NOTE: To follow along with the instructions below, use Tableau’s Sample-Superstore data that is included with every release of Tableau.

Method 1: Use Tableau Server groups and a workbook filter (requires Tableau Server or Tableau Online)
In Tableau Server or Tableau Online, use groups to secure data. Users are assigned to groups and a calculated field is used to determine which group the user is a member of. This calculated field can be used to filter the data displayed in your Tableau worksheets. Groups can have one level of security (Region in the example below) or data access can be based on multiple fields, such as Region and Segment.
To create your own groups to filter and secure data, use Tableau’s Sample-Superstore to follow the steps below:
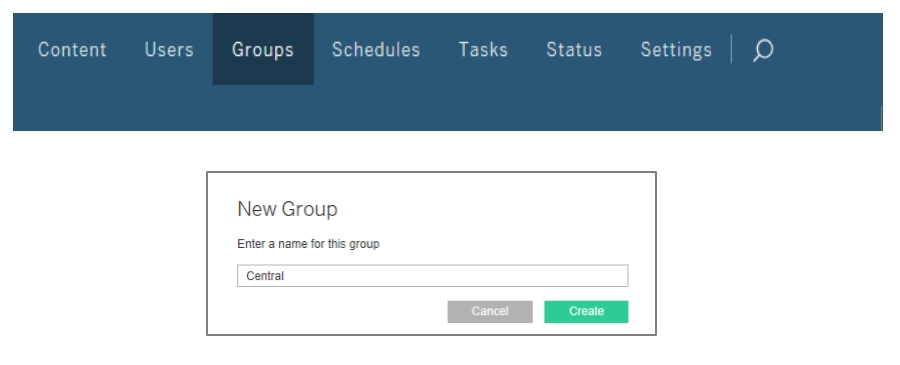
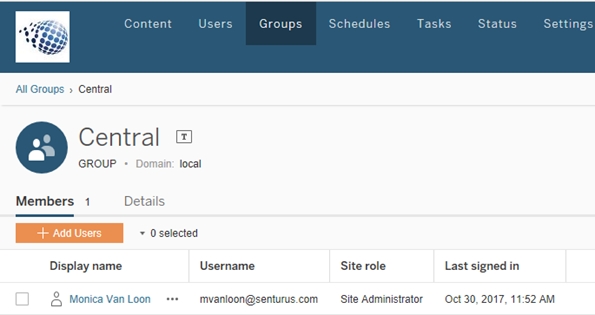
- Create the following Tableau Server/Tableau Online groups: Central, East, West and South

- Assign one or more users to each group using Add Users :

- Create a Tableau workbook using the Excel file Sample-Superstore as your data source.

- From the Server tab at the top of your workbook, log into Tableau Server/Tableau Online. At the bottom of your screen you will see a silhouette icon next to the name you are logged in as:

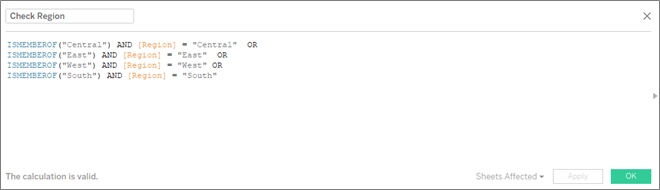
- From the Analysis tab at the top of your Tableau worksheet choose Create Calculated Field. Use the syntax depicted below:

- Drag the newly created Check Region calculated field to the Filters Card. Do this for every worksheet you need to secure.
- Select True in the filter. Now your worksheet looks at the Tableau Server/Tableau Online User ID and displays the correct data based on the calculated field.
NOTE: When publishing the workbook to Tableau Server or Tableau Online, make sure Web Editing is set to No and Download is set to No. Otherwise, users could remove the filter and see all of the data.BONUS: To test what data each user has access to, go to the silhouette at the bottom and click on the down triangle. Here you can switch user names and see how the worksheet would look to another user.

Method 2: Tableau user filters (requires Tableau Server or Tableau Online)
If you don’t have access to create and modify Tableau Server Groups, you can restrict data with Tableau User Filters. User Filters are easy to create in Tableau Desktop and are best for stable or small user communities because they need to be maintained.
- In Tableau Desktop, open a workbook using Sample–Superstore.xls. Or, you can create a new workbook.
- Verify you are logged into Tableau Server or Tableau Online. If not, go to Server – Sign-in at the top of your workbook. To verify, look at the bottom of your screen: you should see your Tableau Server ID, like this:
- Navigate to the worksheet to which you want to apply a filter.
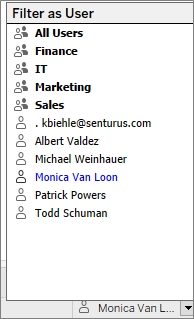
- Select Server > Create User Filter. Then select the field you want to use for filtering the view. For our example we will use Region.
- In the User Filter dialog box, type a name for the set of rules you are creating.
- We will call this user filter Regional Managers
- In the list on the left, select a User/Group. On the right, under Members for: select what you want the selected users to see. Do this for each Tableau Server/Tableau Online user.In the example below, Monica Van Loon is the manager of the Eastern region, so in the member list on the right, only East is selected.
 BONUS: If your Tableau Server/Tableau Online is set up for email subscriptions, User Filters can be combined with Subscriptions.DOUBLE BONUS: If subscriptions are enabled in your Tableau Server/Tableau Online environment, these can be combined with User Filters to ensure the right content goes to the right people on a regular basis.

 BONUS: If your Tableau Server/Tableau Online is set up for email subscriptions, User Filters can be combined with Subscriptions.DOUBLE BONUS: If subscriptions are enabled in your Tableau Server/Tableau Online environment, these can be combined with User Filters to ensure the right content goes to the right people on a regular basis.
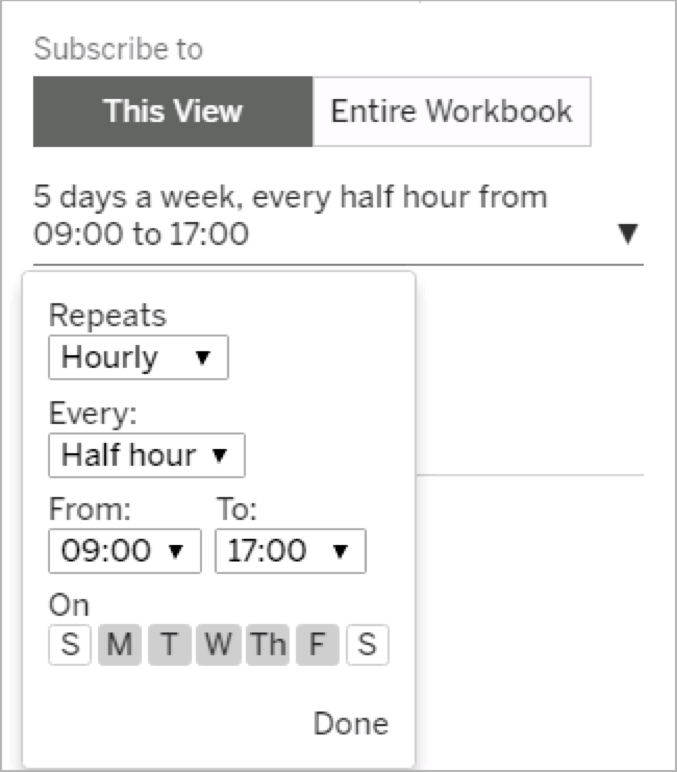
Conclusion
Report creation can, and should, be an efficient process. Ideally, you want to create one dashboard with filters that ensure the right data is shown to the right people. But getting this functionality to work properly can be tricky. The correct way to secure your Tableau content depends on numerous factors such as
- Your environment (Tableau Server/Tableau Online or not)
- Your access to Tableau Server (can you create groups)
- The number of users you need to set up (user filters must be maintained)
- You access to a database that supports security
These are just some of the methods used for securing data by user in Tableau. Reviewing these methods and instructions will help you make the choice that works best in your Tableau environment.
For more details and how to distribute your Tableau content, read our blog 6 Ways to Publish and Share Tableau Content.